I sat down one day and decided on all the keepsake crafts I was going to do with my grandchildren each year. On their very first Thanksgiving, I'm making these adorable little Footprint Turkey Plates! It wasn't my intention to do turkeys first BUT it is so much easier to do footprints with under 1's!!
As you have probably come to realize - I get my most recent inspiration from Pinterest. Nothing is different in this case either lol I took 3 ideas off of my Grandbabies:: First Thanksgiving board (which needs a new name cause this actually holds ideas for like the first 10 years!!). The ideas are this one, that one, and the other one. These three ideas are a cached image found here, My Rural Mommy which has several cute ideas, and SheKnows Pregnancy & Baby.
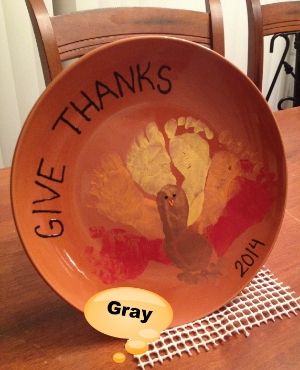
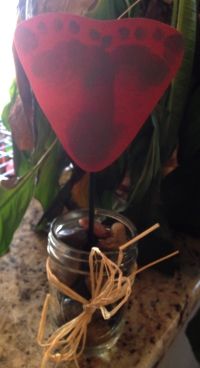
So, you see what I did there? I combined them! Feet all the way! I tried to use the hands and quickly realized trying to do baby handprints with paint or ink simply is a FAIL! Do not try it unless you are elast-a-mom with 8 tentacles - just don't do it.
I will tell you what you can do with baby handprints though - that's clay impressions or tracing! I did a little of that as well - tracing that is. But that's another post for another day.
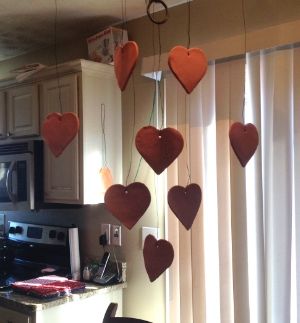
This was a super cheap craft for me to make such a precious memory. I already had the paints so all I had to do was pick up a plate from the dollar store and wah-lah! Later, I had to spend a couple more $$ on a way to hang the plate (notice I had to rig up a display in order to take a picture ... there was simply too much glare when it was laying flat). Still well worth the price! The little man was so cute doing this - it tickled his feet to have them painted but he was such a good sport!! He was a little captivated by the whole process lol His favorite part was getting to sit on the side of the sink and playing in the water - such a ball of cuteness!! This was pretty much an all day activity between having to wait for paint to dry and naps before moving on to the next color. Experience is teaching me how to get better at getting those sweet little impressions. Now watch it be different for each baby!
So what's my plan with these little plates, you ask? I'm so glad you asked! And I really can't wait to show you - this coming November ;-) I bought some little hanging plate holders. They have springs so that it is adjustable to the size plate you have. I knew I wouldn't have enough flat "table" space to display the number of plates I will eventually have.... so I was a wee bit excited to find those little gems so I could hang them on the wall without having to attach some funky equipment that might come loose and risk breaking these precious plates that I can never replace.
God-willing, every grand child will make one of these on their first Thanksgiving! The ones so far away will be more difficult but at the same time will be all the more precious because of the distance.
Showing posts with label Pinterest. Show all posts
Tuesday, February 17, 2015
Sunday, February 15, 2015
Clay Hearts
What I was going for and what I got were two different things! Heh, not everything can go wondrously ;-)
I used a different recipe than the normal salt dough I typically use. While I do really like it better than the salt dough, it took a little working with to get it the right consistency - which took up a lot of my time I wasn't prepared to give. Anyway, I used a recipe calling for baking soda and cornstarch rather than salt and flour. I found it at Tips From a Typical Mom blog. I decided to try this new recipe for two reasons:
1) It just looked nicer in the photos, and...
2) I'm allergic to gluten and have to wear gloves when working with salt dough
Just makes sense to use the cornstarch recipe instead.
I think I baked them a little too long, rather than allowing the final cooling stage to completely dry them out. Some warped and cracked during the final baking phase I put them through - an hour longer than called for in the recipe. Even at the end of that hour, when I flipped them over there were "not completely dried spots." I decided at that point to let them air dry. Three cracked so badly they broke right there on the pan without me ever picking them up! I was so careful when handling the rest of them!!
As it was, I had wanted to make conversation hearts out of these, but didn't realize I didn't have enough cornstarch to make multiple batches. See, you add color to the water if you want to tint the dough. Makes me glad I used red first so that I at least had pink hearts instead of all orange or green!
I have seen these adorable hanging works of art where green ornaments are hung in a manner that they fall into the shape of a Christmas tree. I love the concept - a lot! So I thought, why not hang the hearts in the shape of a heart?? Cute in idea concept, not so cute in actuality when I don't really have the proper way to hang said hearts. I had wanted them to hang from my chandelier as seen in this photo on Pinterest. The idea comes from an article on SheKnows. In the past couple of years, I had been hanging these little paper doily hearts via ornament hooks on the chandelier. It was kinda cute the first year, but not so much the second. Hence, why I wanted to find something else to do this third year. I probably should have stuck to simply hanging them instead of getting all cutesy with a 3D, floating shape!!
The center heart has an XO stamped in the center of it. I had done that when I thought I was going to be making a bunch of conversation hearts. Perhaps next year!
Did you notice my un-paper towels laying beside the stove?
Framed Hearts
I have a small affinity for framed work - not all framed work, mind you - very specific types of framed art. I saw a similar piece, again, on Pinterest. I just had to try my hand at it. This idea is found at Scrapstudio. I had no newspaper so I used an old book that I never planned on reading again. I chose 5 pages in which there was talk of love - not physical love, but real heartfelt love - my favorite being about a son who sat down to have a serious conversation with his dad in which the son simply wanted to make sure his dad knew that he really loved him.
Then I sat down with a bunch of scraps, that I normally would have thrown away, from making other crafts and cut hearts of different shapes and sizes. As I began placing the hearts, I realized I needed more as I wanted to connect them all just a little bit. I think it turned out pretty good. If I could change the polka dot hearts to have at least the merest of outlines I would, but I'm not sure how to do so without ruining them. I'll think on it or run across an idea eventually and then *maybe* I'll attempt to change them!
For now, this my framed work. I think it turned out decently, even if I do think the idea I ran across is much better!
The First Footprint Flower in the Garden
I saw an idea on Pinterest and wanted to use it for something a little different. The idea at Tippy Toe Crafts is for a daughter to give to her mother. (It's about 1/3 of the way down the page.) Obviously, this is not appropriate for me considering I'm the grandmother! However, when I saw these adorable little footprint flowers I had a vision of a "garden" of footprints on my bar :-D Thus begins my "collection" of grandbaby footprints for the express purpose of making flowers! I've already determined that I will make each grandchild's footprint different in scope of background and ink color ... possibly even in positioning to make different "flowers." That portion is yet to be determined, though.
The only thing missing is the sign I haven't made yet. It will say "Mimi's Garden."
Without further delay here is the first flower in the garden!
Mind not, the dying plant behind my newly bloomed flower. It is left from my mom's funeral and I just can't quite throw it out yet.
The only thing missing is the sign I haven't made yet. It will say "Mimi's Garden."
Without further delay here is the first flower in the garden!
Mind not, the dying plant behind my newly bloomed flower. It is left from my mom's funeral and I just can't quite throw it out yet.
Saturday, February 14, 2015
Kisses
So my honey is going to his mom's tomorrow to stay for a couple of nights while father-in-law is in the hospital. I miss him when he's gone even though we both do this from time to time for our parents when they need us. So to let him know I'm thinking about him, I made these cute little kisses to take with him.... but he won't know he's taking them until he unpacks his bag! I have this pin on my Pinterest board but they are located at illbelovingu (which is a 'by invite only' blog).
Originally, I was going to make these for Valentine's Day and surprise him when he got home from work by having them hidden around the house ... but since the plans were made to go to his mom's a few days ago, I decided to change how I used them. Hence, why these are on my Past Events:: Holidays:: 2015:: Feast of Saint Valentine :-D
On the back....
There are 12 kisses and they say....
You're the most thoughtful man I know.
I love spending time with you!
You make me feel like the only girl in the world.
Still not sure why you picked me. But glad you did!
Thank you for listening to me rant.
I trust you unlike any other.
Need a kiss?
I like going out with you.
Thank you for making me feel wanted.
Love how you make me laugh!
I miss you when you're gone.
I simply love you for you.
Monday, February 9, 2015
Finished Set of Burp Cloths!
Monday, February 2, 2015
Baby Wash Cloths
I'm so excited about this next little venture! For some odd reason when I saw this idea at 2 Little Hooligans, that I found on Pinterest, I just knew I had to make some myself. Talk about cute, cute, cute! Christina has a wonderful tutorial and made making these little gems so easy - trust me, I would have made this way harder than it is. Oh and folks, let me tell you, learning to draw sewing lines on my fabric has revolutionized my sewing - seriously, revolutionized.
These are merely the first in 40 I plan on making before March. Thirty-two are cut out, 28 are pinned together or sewn together (but not edged yet). As I ran out of brown thread for the majority of these adorable little creations, I realized I had some blue and could do a few start to finish.
These 40 that I'm making are 8x8in. The fronts are a cotton print, the backs are crushed velvet. The original calls for a minky. I tested both out on one of my daughters and she said she preferred the crushed velvet because the fibers are shorter and the fabric is a little lighter (weight-wise). When I think of bathing babies I tend to think of a very light fabric. The price difference helped make the decision for these first presents. As I get more experience and widen my purview of cloth types, including using minky ... eventually.
This picture shows a little more detail of an individual. You can also see the bottom of my drinking glass in the top of the picture to give a little perspective.
Sunday, February 1, 2015
Burp Cloths
I love cute burp cloths! I just can't help it! What can I say, it just makes spit up so much more bearable lol I actually discovered this idea on Pinterest from Sew4Home.
I tend to make burp cloths in sets of 8 out of 4 different prints. Then each one is yet unique. For each print, I use different number of ribbons (1 or 2) and a different stitch-edging as you can see in the pictures.
This first set is the very first set I ever made for my first grandson.
The next 2 are for a friend of mine who had a baby girl 2 months ago. They were supposed to be a shower gift, but I was busy caring for my mom and didn't have time to sew. So they are now going to be a baptism present! There are 6 more on the way ....
Friday, January 30, 2015
Welcome to Bottoms & Bows!
Welcome to my sewing & creations blog ~ Bottoms & Bows!
Here I will post all of my handmade creations and where I got the patterns or ideas! Along the way I'll have a few Blasts From the Past to showcase a few of my past endeavors.
Bottoms & Bows encompasses so much more than just sewing and crafty creations but it is the "parent company" of side ventures for Greenbean Herbal & Beauty and SugarBear Parties & Creations! So you never know exactly what you might find in these pages ;) However, if you are specifically looking for a particular type of post, just peruse the labels section and click on whatever type of creation you want to see!
You can follow me on Pinterest if you like ~ just click here. At the bottom of my page there is a whole bunch of boards labeled Past Events:: and sprinkled among my boards are things like Gifts:: Made. If I've tried it, I've commented on it!
Bottoms & Bows started out about 11 years ago. Initially, I just wanted to sew diapers and related items. My godson's mother and I were full throttle and getting ready to open an online store. Then my godson died. It was a really long time before I started thinking about sewing again.
However, somewhere along the way, long before I started thinking about sewing again, I began to start making my own herbal remedies and beauty products rather than buy them. This blossomed and is still blossoming - who knows what the final bouquet is going to look like! Obviously, the name of the bouquet is Greenbean Herbal & Beauty :D
Finally, my best friend since Kindergarten created awesome cakes. I mean she created masterpieces! We founded an idea to not just do make cakes but to throw parties. It began as end-of-the-season parties for sports leagues and then began to encompass so much more. Nearly two years ago, she was struck with an aneurysm and subsequent stroke that has left her physically unable to do anything like that. I have not given up hope though!!! She's come a lot farther than we thought she would and she is mentally, completely there - no personality changes, same stinkin' sense of humor, and same encouraging and loving best friend I had before. I've already begun trying to find a one-handed rolling pin (she has use of one arm) for I'm determined that she will help in the kitchen once again! So for the time being, SugarBear Creations is currently only used for family.
I do hope you enjoy yourself! And please, let me know if you made anything I post about and how it turned out for you!!
Subscribe to:
Posts (Atom)